

Hello Readers,
With this as My 50’th BlogPost, I’m here to bring some PowerShell fun in your lives 🙂
Today we’ll talk about Microsoft’s Project Oxford and its key capabilities like Emotion API.
What is Project Oxford?
Project Oxford is Microsoft’s Cloud based artificial Intelligence, that allows developers to automate Sophisticated tasks that would just be too costly and time-consuming for them to do by hand because Features this Project offers are only possible with advanced Machine Learning that you don’t have the time or resources to do on your own.
Some Key offerings of this projects are –
- Face and Emotion Detection
- Speech Processing
- Language Understanding Intelligent Service (LUIS)
What is Machine Learning?
Machine learning is a sub field of computer science that evolved from the study of pattern recognition and computational learning theory in artificial intelligence. In short these are algorithms to make data-driven predictions or decisions. Which has made Self driven cars such as Tesla a reality.
HOW IT WORKS WITH POWERSHELL :
Emotion API is a RESTfull API that returns Structured data when called with Proper parameters and information.
So here we’ll Pass a Locally Stored Image and some other parameters to the Microsoft Emotion API in the cloud using the Invoke-RestMethod cmdlet, which will return a structured information like in below snaphot
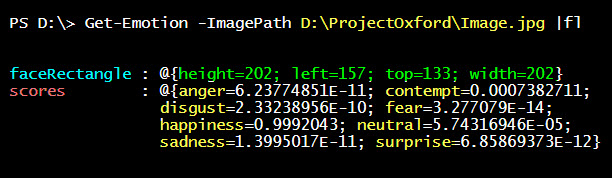
Structured data in above snapshot has some important attributes.
- FaceRectangle : This is the Rectangle’s location on the Image where the Face has been detected
- Scores : Scores are the Emotional variants based upon 8 common Facially expressed emotions by Humans all across the globe. Since my Image had just single Face in it, hence only one Face was detected, returning one set of {FaceRect, Scores} pair. If we pass an Image comprising of more faces, there will be multiple {FaceRect, Scores} Pairs returned as a result.
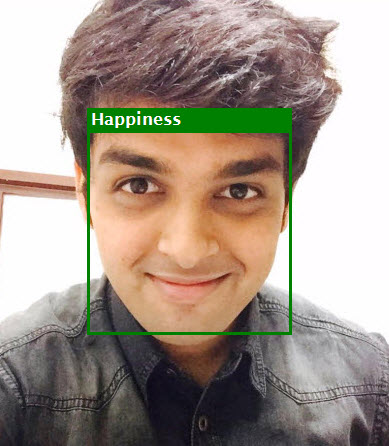
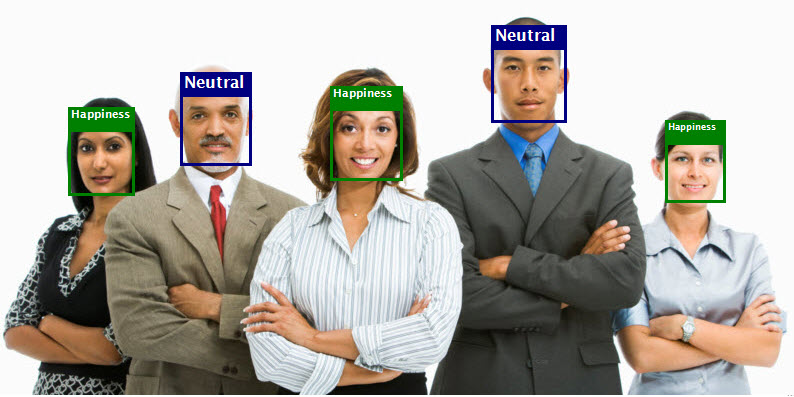
So we know the Exact Location on the Image, where a face has been detected and what are the various Emotions on the detected face.
With this data in our hand its just a 3 step process to detect and show emotions on all faces on the Image –
- Calculate the Strongest Emotion : This the highest value in the Emotion score returned.
- Draw Two rectangles : Using the System.Drawing class draw two rectangles to meet following purposes.
- FACE RECTANGLE – This will Surround the face using the Location of the FaceRectangle attribute returned from the API.
- EMOTION RECTANGLE – This Rectangle would be smaller in height and will sit upon the top edge of Face Rectangle, holding the Strongest Emotion name Calculated in Step 1
- Invoke GUI and stick Image on it : Now with Rectangles drawn and the Emotion Marked on the Image, we’ll create a windows form to place this Image, using the System.Windows.Form class. The result will look something like the following Images
SINGLE FACE IMAGE :
GROUP IMAGE
NOTE : I broke down the script in just 3 major steps mentioned above, but the script has more has more sub steps and lots of Data Wrangling involved.
SCRIPT :
| Function Get-Emotion() | |
| { | |
| [CmdletBinding()] | |
| Param( | |
| [Parameter(Mandatory=$true,ValueFromPipeline=$true)] | |
| [string] $ImagePath | |
| ) | |
| $Splat = @{ | |
| Uri= "https://api.projectoxford.ai/emotion/v1.0/recognize?language=en&detect=true&subscription-key=60a44ded0c024b77b61c6d7e9efe2afa" | |
| Method = 'Post' | |
| InFile = $ImagePath | |
| ContentType = 'application/octet-stream' | |
| } | |
| Try{ | |
| Draw-Image (Invoke-RestMethod @Splat) | |
| } | |
| Catch | |
| { | |
| Write-Host "Something went wrong, please try running the script again" -fore Cyan | |
| } | |
| } | |
| Function Draw-Image($Result) | |
| { | |
| #Calling the Assemblies | |
| [void][System.Reflection.Assembly]::LoadWithPartialName("System.windows.forms") | |
| [void] [System.Reflection.Assembly]::LoadWithPartialName("System.Drawing") | |
| $Image = [System.Drawing.Image]::fromfile($ImagePath) | |
| $Graphics = [System.Drawing.Graphics]::FromImage($Image) | |
| Foreach($R in $Result) | |
| { | |
| #Individual Emotion score and rectangel dimensions of all Faces identified | |
| $Scores = $R.scores | |
| $FaceRect = $R.faceRectangle | |
| #Emotion Objects | |
| $Anger = New-Object PSObject -Property @{Name='Anger';Value=[decimal]($Scores.anger);BGColor='Black';FGColor='White'} | |
| $Contempt = New-Object PSObject -Property @{Name='Contempt';Value=[decimal]($Scores.contempt);BGColor='Cyan';FGColor='Black'} | |
| $Disgust = New-Object PSObject -Property @{Name='Disgust';Value=[decimal]($Scores.disgust);BGColor='hotpink';FGColor='Black'} | |
| $Fear = New-Object PSObject -Property @{Name='Fear';Value=[decimal]($Scores.fear);BGColor='teal';FGColor='White'} | |
| $Happiness = New-Object PSObject -Property @{Name='Happiness';Value=[decimal]($Scores.happiness);BGColor='Green';FGColor='White'} | |
| $Neutral = New-Object PSObject -Property @{Name='Neutral';Value=[decimal]($Scores.neutral);BGColor='navy';FGColor='White'} | |
| $Sadness = New-Object PSObject -Property @{Name='Sadness';Value=[decimal]($Scores.sadness);BGColor='maroon';FGColor='white'} | |
| $Surprise = New-Object PSObject -Property @{Name='Surprise';Value=[decimal]($Scores.surprise);BGColor='Crimson';FGColor='White'} | |
| #Most Significant Emotion = Highest Decimal Value in all Emotion objects | |
| $StrongestEmotion = ($Anger,$Contempt,$Disgust,$Fear,$Happiness,$Neutral,$Sadness,$Surprise|sort -Property Value -Descending)[0] | |
| #Create a Rectangle object to box each Face | |
| $FaceRectangle = New-Object System.Drawing.Rectangle ($FaceRect.left,$FaceRect.top,$FaceRect.width,$FaceRect.height) | |
| #Create a Rectangle object to Sit above the Face Rectangle and express the emotion | |
| $EmotionRectangle = New-Object System.Drawing.Rectangle ($FaceRect.left,($FaceRect.top-22),$FaceRect.width,22) | |
| $Pen = New-Object System.Drawing.Pen ([System.Drawing.Brushes]::$($StrongestEmotion.BGColor),3) | |
| #Creating the Rectangles | |
| $Graphics.DrawRectangle($Pen,$FaceRectangle) | |
| $Graphics.DrawRectangle($Pen,$EmotionRectangle) | |
| $Region = New-Object System.Drawing.Region($EmotionRectangle) | |
| $Graphics.FillRegion([System.Drawing.Brushes]::$($StrongestEmotion.BGColor),$Region) | |
| #Defining the Fonts for Emotion Name | |
| $FontSize = 14 | |
| $Font = New-Object System.Drawing.Font("lucida sans",$FontSize,[System.Drawing.FontStyle]::bold) | |
| $TextWidth = ($Graphics.MeasureString($StrongestEmotion.name,$Font)).width | |
| $TextHeight = ($Graphics.MeasureString($StrongestEmotion.name,$Font)).Height | |
| #A While Loop to reduce the size of font until it fits in the Emotion Rectangle | |
| While(($Graphics.MeasureString($StrongestEmotion.name,$Font)).width -gt $EmotionRectangle.width -or ($Graphics.MeasureString($StrongestEmotion.name,$Font)).Height -gt $EmotionRectangle.height ) | |
| { | |
| $FontSize = $FontSize-1 | |
| $Font = New-Object System.Drawing.Font("lucida sans",$FontSize,[System.Drawing.FontStyle]::bold) | |
| } | |
| #Inserting the Emotion Name in the EmotionRectabgle | |
| $Graphics.DrawString($StrongestEmotion.Name,$Font,[System.Drawing.Brushes]::$($StrongestEmotion.FGcolor),$EmotionRectangle.x,$EmotionRectangle.y) | |
| } | |
| #Define a Windows Form to insert the Image | |
| $Form = New-Object system.Windows.Forms.Form | |
| $Form.BackColor = 'white' | |
| $Form.AutoSize = $true | |
| $Form.MinimizeBox = $False | |
| $Form.MaximizeBox = $False | |
| $Form.WindowState = "Normal" | |
| $Form.StartPosition = "CenterScreen" | |
| $Form.Name = "Get-Emotion | Microsoft Project Oxford" | |
| #Create a PictureBox to place the Image | |
| $PictureBox = New-Object System.Windows.Forms.PictureBox | |
| $PictureBox.Image = $Image | |
| $PictureBox.Height = 700 | |
| $PictureBox.Width = 600 | |
| $PictureBox.Sizemode = 'autosize' | |
| $PictureBox.BackgroundImageLayout = 'stretch' | |
| #Adding PictureBox to the Form | |
| $Form.Controls.Add($PictureBox) | |
| #Making Form Visible | |
| [void]$Form.ShowDialog() | |
| #Disposing Objects and Garbage Collection | |
| $Image.Dispose() | |
| $Pen.Dispose() | |
| $PictureBox.Dispose() | |
| $Graphics.Dispose() | |
| $Form.Dispose() | |
| [GC]::Collect() | |
| } |
HOW TO USE IT :
Compile and Run the Script like in the animation below.

Hoping you’ll find this fun. 🙂
0 Comments
Leave a Reply

Author of Books


Awards


Open Sourced Projects

Author at


Blog Roll
Mike F RobbinsDamien Van Robaeys
Stéphane van Gulick
Kevin Marquette
Adam Bertram
Stephanos Constantinou
Francois-Xavier Cat
Ravikanth Chaganti
Roman Levchenko
Awesome stuff. Lots of fun. Something to annoy my friends on social media with!
Thanks 🙂 have fun
[…] my previous post we discussed about Emotion detection using Microsoft Project Oxford and in this Blog post […]
Wow Cool Stuff, thanks for that! Do you think it is easy to use the other cognitive Rest Api’s from Powershell as well? Thanks for doing this good stuff
Thank you 🙂 and yes its very easy to use with Powershel, I’ve wrapped other cognitive services in a Powershell Module ‘ProjectOxford’ you can check on following blog post – https://geekeefy.wordpress.com/2016/07/08/powershell-module-for-microsoft-congnitive-services/
[…] my previous post we discussed about Emotion detection using Microsoft Project Oxford and in this Blog post […]